Monday, March 12, 2012

Photographing The Urban Landscape

Reframing Metropolis

Landscape photography is one of my great loves - sunsets, seashores, mountain lakes and stunning vistas, images that leap off of the page and inspire dreams of travel and adventure. I began my study of photography in earnest after viewing exhibitions of the great masters. Their work was so compelling, so visually arresting that it almost didn't seem possible. I wanted to understand their approach and the techniques involved. I wanted to learn all that I could so that one day I might realize my own landscape vision.

My dream faced two immediate complications. Firstly, I had no photographic skills or training; I didn't even own a decent camera. I would need to learn the art and craft of photography from the ground up. Secondly, I didn't live near a scenic wilderness. My life is conducted mostly in cities. I could travel on occasion, but I wouldn't be able to build a portfolio by working only a few weeks out of the year. I would need to shoot as often as possible, and that meant photographing nearby places.

This raised interesting questions. Could I apply the elements of landscape photography to an urban setting? Would the merger of landscape techniques and city skylines yield images that could satisfy the discriminating viewer? 


a photo of lower manhattan without the world trade center
Lower Manhattan Without The World Trade Center


Element One - Light

Light is the most critical component of photography no matter where it's done. When I spotted the scene above, the sunset had reached peak warmth. I set the camera up as quickly as possible. Here, I opted to use a specialized "tilt-shift" lens to keep both the foreground and background in focus. But this required extra time and a painstaking manual focusing procedure.

By the time I'd finished composing and focusing, I managed to capture only a handful of shots before the golden glow faded. I could have come back on another day, but the light would have been different and the sky's unique texture would never be replicated.
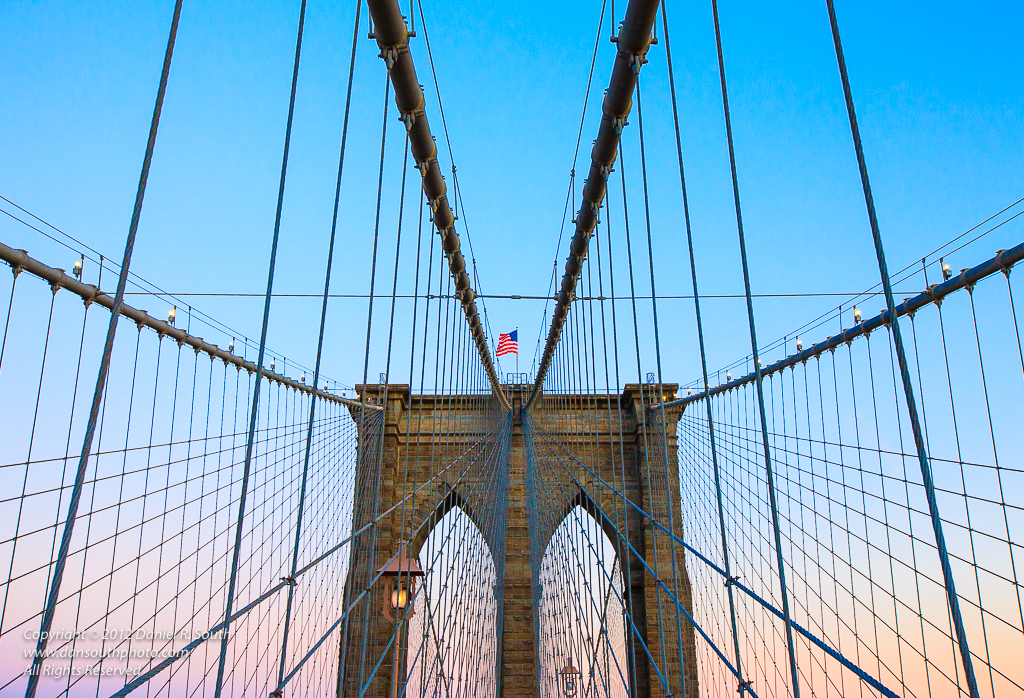


a photo of the brooklyn bridge at sunset
Brooklyn Bridge Near Sunset


Element Two - Composition

The Brooklyn Bridge is a highly photogenic structure, but it's usually crowded with cars and mobbed with pedestrians. Standing on the boardwalk in the center of the bridge I shot upward to isolate the support and the suspension wires from the bustling activity below. The result is a clean, tranquil composition that highlights the geometrical complexity of the intersecting wires. A gust of wind unfolded the flag as the sunset cast pastel colors on distant haze.


a photo of sailboats at the world financial center marina
Sailboats - World Financial Center Marina


Element Three - Adaption To The Surroundings

Urban photography presents special challenges. Tripod usage is rarely questioned in the wilderness or in national parks. But set up a tripod in the city and you're likely to meet some new friends. Overzealous security guards can materialize seemingly out of thin air to inform you - correctly or incorrectly - that tripod usage is forbidden in the area where you were about to take your photo.

The walkway encircling this marina is full of security guards and camera-unfriendly park employees. I didn't even bother to pull the tripod out of its bag. Without a tripod the low light levels would present a challenge - if the shutter speed were too slow, a handheld image would be blurred from 'camera shake'. I needed to find another way to manage movement and capture a sharp image.

I boosted the camera's ISO setting to 3200. This is close to the limit where the sensor will record visible electronic noise, but it increased the shutter speed enough to make a handheld shot possible. The final image is surprisingly sharp and detailed. 


a photo of lower manhattan new york under a pink sky
Lower Manhattan Under a Pink Sky


Element Four - Being Present And Observant

All of the light in that we see passes through our atmosphere. As conditions change from clear to cloudy to hazy, the light changes accordingly. We need to be present and observant in order to leverage these changes for our benefit. What is the light doing now? How quickly is it likely to change? Which subjects would photograph well in the light that's available? Are distant clouds threatening to block the light or obscure the sunset?

Occasionally, the atmosphere itself becomes the subject of the photo. I was about to put my camera away for the evening when I spotted these pink clouds standing out against the blue cast of the twilight sky. I was able to capture the unusual blend of colors just seconds before the pink light faded into oblivion. Something happened that I hadn't expected, and I was able to exploit it and capture a fresh interpretation of a well-known skyline. I was present and observant. And ready.

The Grand Urban Landscape concept shows promise. As a bonus, we won't have to sleep in tents to shoot city skylines. Some hiking may be required, however.  ;-)


Camera:
            Canon EOS 5D Mark II

Lenses:
            Canon 16-35 f/2.8L II
            Canon TS-E24 f/3.5L II


Wishing you great light and meaningful moments!


Copyright © 2012 Daniel R. South
All Rights Reserved


Saturday, March 3, 2012

Revelation At Pigeon Point Lighthouse

"We Take Pictures Of Light"

It sounded so simple at the time. While leafing through a magazine that I was about to recycle, I came across an interesting passage. It puzzled me at first, but it would become the single most important piece of advice I that would receive as a photographer. I don't even remember the author's name - and I apologize for not quoting him here - but I do remember his words. The idea stuck in my mind because it challenged me to think in a new way.

"We don't take pictures of people, places, or objects.  We take pictures of light."

It would be years before I would understand the significance of this message, but one evening at Pigeon Point moved me closer toward that realization.


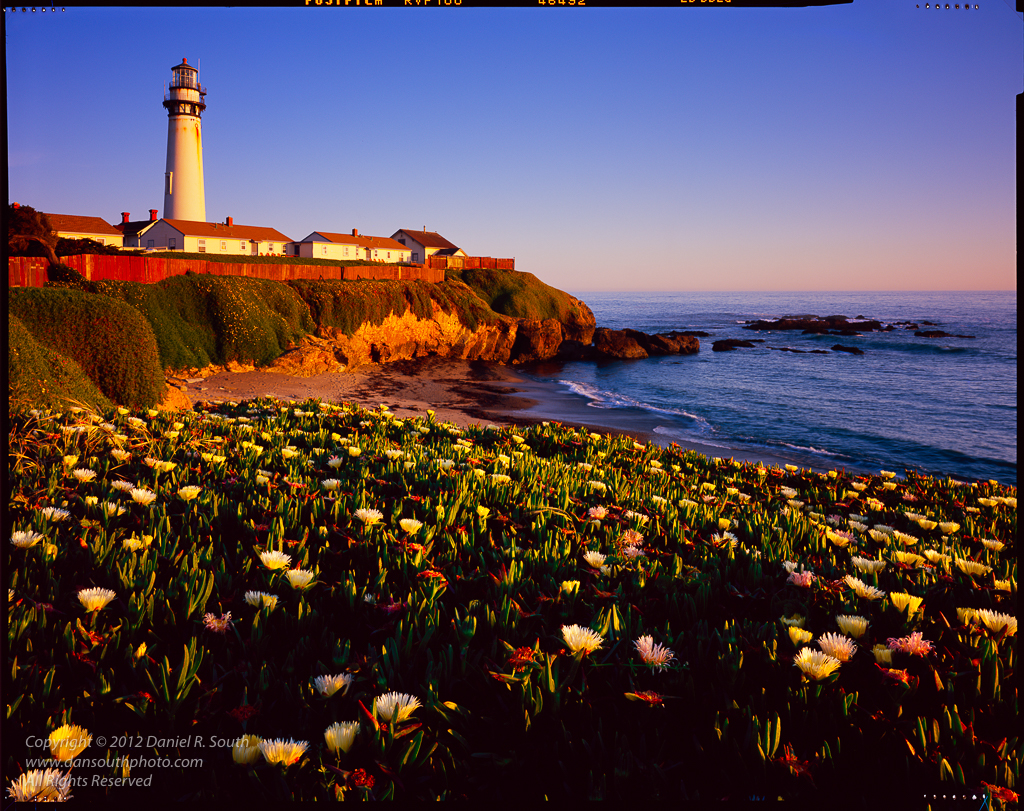
a photo of the pigeon point lighthouse in california with spring wildflowers
Pigeon Point Lighthouse, Ebony SV45TE, Fujichrome Velvia 100


Light. Photographers talk about light all the time - good light, bad light, quality of light, the right light, the direction of light, waiting for light. But what is good light and where do you learn about it? I don't recall seeing any books or articles on the subject. Magazines and websites talk mostly about equipment. Photography books explain principles of exposure and composition, but the subject of light merits little discussion.

When I bought my first "serious" camera and started pointing it at the world, I had very naïve ideas about what constituted good light. My early attempts at photography suffered as a result. I assumed that a technical understanding of exposure and lenses and filters would create memorable images.

As a budding enthusiast I made a trip to California in search of photo opportunities. I had a nice camera, decent lenses, and I was surrounded by world class scenery, yet the photos from that trip were not particularly memorable. They were technically solid - the exposure was correct and the focus was accurate - but the images lacked impact. My limited understanding of light was a big factor.

I did gain some insights on the trip, and over time with more study and experimentation I made steady progress. When I returned to California two years later, I considered myself to be a seasoned and knowledgeable photographer. But there's always more to learn.

On the last day of my travels I planned make a stop at Pigeon Point Lighthouse. It's one of my favorite destinations on the California coast. I would have limited time to shoot the sunset, then it would be off to the airport for an overnight flight.

Conditions were excellent. The calm air was clear and warm. Coastal plant life was in bloom. I was shooting during the last hour of daylight, the "golden hour" that landscape photographers pursue. I shot several rolls of film thinking that I was coming away with good images in good light. I was about to pack up and head toward the airport.

Then it happened. The light changed before my eyes. It morphed into something better, something amazing. It was richer, warmer, more colorful, and more magical than any light that I could remember having photographed before.  I was running short on time, but I couldn't leave. I needed to keep shooting. Luckily I still had some film in my bag.

I shot as many frames as I could. The light probably lasted all of about four or five minutes. When it faded, I quickly packed the car and sped off toward the airport. I was concerned about missing my flight, but I couldn't stop thinking about the majestic light that I had just witnessed. Why hadn't I seen it before, or if I had, why didn't I pay more attention? The photos from the entire trip would have been better if I could have anticipated and harnessed this phenomenon.

"We don't take pictures of people, places, or objects. We take pictures of light."

I was beginning to get the message.


Over the coming years I became a student of light. I actively pursued the conditions where the best light was likely to reveal itself. It doesn't happen every day, but I began to experience it more and more frequently as I learned what to look for.


Lighthouse Tower In Focus

On my next trip to California I shot primarily with a large-format view camera. The view camera has distinct advantages. First of all, the film is larger and can produce a finely detailed image when exposed carefully. View cameras also feature a flexible build. The lens and film planes are independently adjustable and linked together by a soft leather bellows. The flexible design helps eliminate distortion and solves some tricky focusing problems.

For instance, it's very difficult to get both near and far objects in focus. Usually, only one or the other will be sharp, but the view camera makes it possible to have them both in focus in many circumstances.


Foreground Flowers In Focus

At Pigeon Point I was able to use the special features of the view camera to keep both the flowers and the tower in sharp focus. The ocean has a softer, slightly out of focus look, which adds to the mood of the overall image. Luckily, I was very fortunate and met with excellent light on several occasions. The image displayed here is from one of those lovely sunsets.


A Note On Colors And Processing

Below I have included the original scan showing the film borders. I asked the technicians who scanned the file to add only enough processing to match the look of the original piece of film on a light box. They did an amazing job. If you view this piece of film on the light box it will match the color and contrast of the image that you see here. This is the advantage of shooting in good light. You don't need to apply a bunch of Photoshop tricks to make an appealing image. Recognizing good light is the biggest part of the battle.


a photo of the pigeon point lighthouse captured on fujichrome velvia 100
Same image with untrimmed film borders


Bottom line: It took a few years to develop the skills required to make this image, not the least of which was the ability to recognize good light and the conditions that foretell its arrival, and then to capture it effectively. The work that I put in over those years seems well worth it, as I carry the lessons of Pigeon Point and the magic of light with me every time I open my camera bag.


Camera: Ebony SV45TE
Lens: Nikkor SWA 90/4.5
Film: Fujichrome Velvia 100


Wishing you great light and meaningful moments!


Copyright 2012 Daniel R. South
www.dansouthphoto.com
All Rights Reserved